
教程中直接提供了完整的 CSS 代码,因其已经一次性完成。然而,由于每个人的布局可能有所不同,这可能导致位置上的差异,因此新手小伙伴请谨慎操作。
CSS代码
/* 仅在宽度大于 1024 像素时生效 */
@media (min-width: 1024px){
    .post-date {
        background-color: #FFC0CB !important;
        padding: 2px 7px;
        border-radius: 10px;
        color: #ffffff !important;
        width: max-content;
        font-size: 10px !important;
        margin-top: 5%;
    }

    .icon-time::before {
        content: "\e689";
        color: #ffffff !important;
        font-size: 10px;
    }

    .post-meta {
        color: #ffffff !important;
        font-size: 10px;
        text-align: center;
    }

    .post-meta span {
        padding: 3px 6px 3px 6px;
        border-radius: 7px;
    }

    .post-meta span:nth-child(1) {
        background-color: #D8BFD8;
    }

    .post-meta span:nth-child(2) {
        background-color: #DDA0DD;
    }

    .post-meta span:nth-child(3) {
        background-color: #EE82EE;
    }

    .icon-attention::before {
        content: "\e693";
        font-size: 10px;
        color: #ffffff !important;
    }

    .icon-mark::before {
        content: "\e6ab";
        font-size: 10px;
        color: #ffffff !important;
    }

    .icon-file::before {
        content: "\e6ad";
        font-size: 10px;
        color: #ffffff !important;
    }

    .post-meta span a {
        color: #ffffff !important;
    }

    .icon-caidan::before {
        color: #FFC0CB !important;
    }

    .float-content {
        font-size: 14px;
        margin-top: 20px;
        text-align: center;
    }

    .post-list-thumb .post-title h3 {
        text-align: center;
    }

    .float-content p {
        margin-top: 25px;
    }

    .post-content {
        display: flex;
        flex-direction: column;
        justify-content: center;
    }

    .post-list-thumb::after {
        content: "\00a0";
        width: 4px;
        height: 0px;
        position: absolute;
        left: 0px;
        top: 0px;
        background-color: #FFC0CB;
        box-shadow: #FFC0CB 0px 0px 6px;
        border-radius: 10px;
        transition: all 0.8s ease 0s;
    }

    .post-list-thumb-left::after {
        right: 0;
        left: auto;
    }

    .post-list-thumb:hover:after {
        height: 100%;
    }

    .post-thumb a img {
        width: 400px !important;
        height: 250px !important;
        box-shadow: 1px 1px 30px 2px rgba(216,191,216,.3);
        border-radius: 20px;
        border: 1px solid #eee;
        transition: all 1s !important;
    }

    .post-list-thumb:hover {
        box-shadow: 0 1px 12px -6px rgba(0,0,0,.5);
    }

    .post-list-thumb:hover img {
        transform: scale(1.05);
    }

    .post-thumb a {
        overflow: inherit !important;
        top: 25px;
    }

    .post-thumb {
        width: 45%;
        transform: translateX(70px);
    }

    .post-list-thumb-left .post-thumb {
        float: left;
        transform: translateX(-40px);
    }

    .post-content-wrap {
        transform: translateX(-30px) translateY(16px);
            padding-right: 0px !important;
    }

    .post-list-thumb-left .post-content-wrap {
        transform: translateX(30px) translateY(16px);
        padding-left: 0px !important;
    }
}
将以上代码直接粘贴至 style.css 文件中。如果希望单独管理,请将其写成独立的 CSS 文件,并使用以下语法进行导入:
<!-- 自定义 CSS -->
<?php
echo "<link rel=\"stylesheet\" type=\"text/css\" href=\"custom.css\" />";
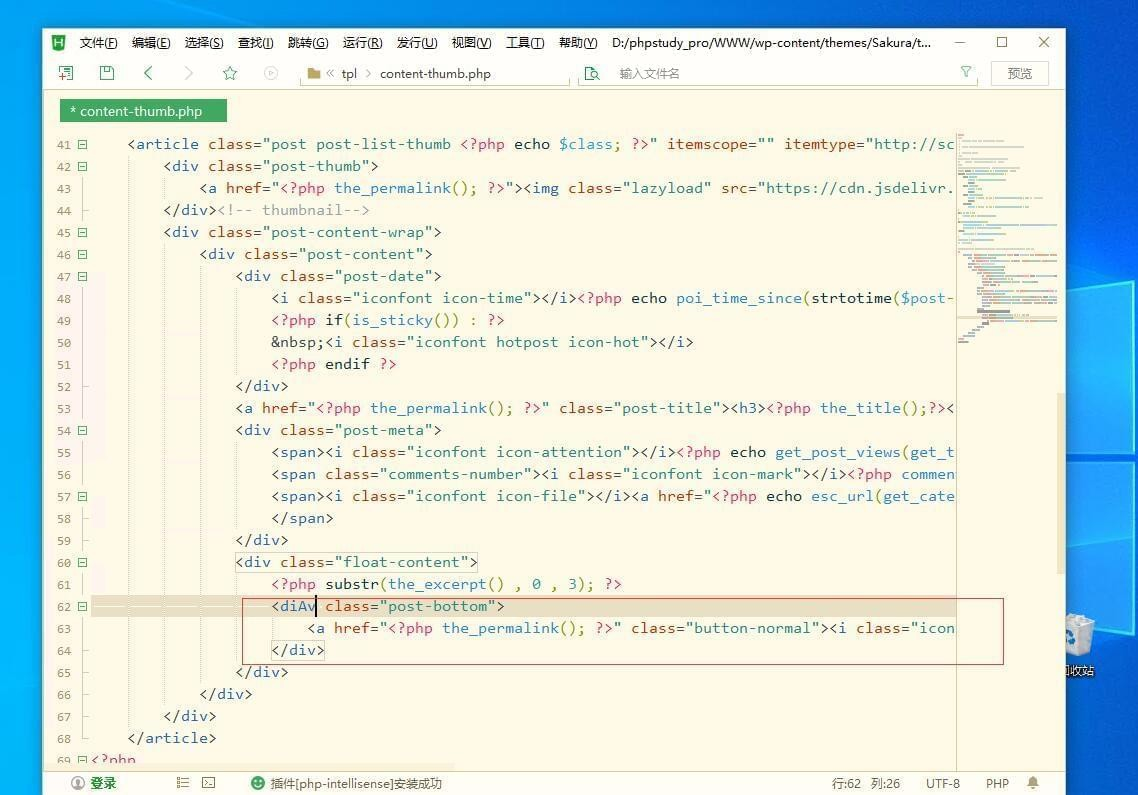
?>删除不必要的区块
注意文件位置,找到并注释或删除以下区域:

开始使用
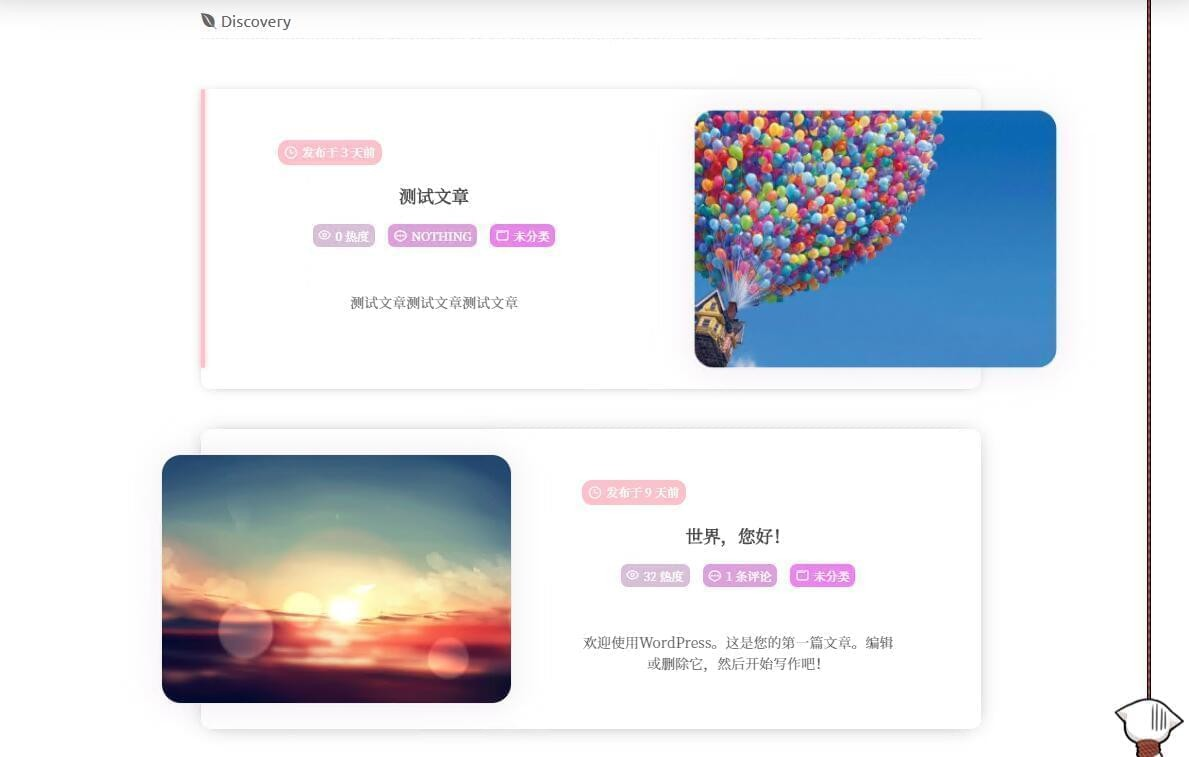
保存 CSS 和页面文件,清理缓存后,返回首页查看效果。如有错误,请使用浏览器的在线调试工具检查布局位置。
效果预览
openssl rand -hex 16 | md5sum | awk '{print $1}' > ./easytier/machine-iddocker-compose.yamlkinoko 是连接我控制台的用户名,gateway-cn 是我的设备名,请注意修改services:
easytier-web:image: easytier/easytier:latest container_name: easytier-web hostname: easytier-web restart: always entrypoint: easytier-web-embed command: --api-host https://你的控制台域名 environment: - TZ=Asia/Shanghai